Showing posts with label recipes. Show all posts

Friday, January 3, 2014

Pork Carnitas


Today I'm sharing with you an authentic recipe for Pork Carnitas. These carnitas are TO DIE FOR!! My husband asks me to cook these for him on a weekly basis. Cooking 4-5 pounds of pork makes a lot so I like to use the meat for other dishes as well. You can easily freeze 3-4 cups of the pork and use later for enchiladas, chalupas, pork nachos, or even put some on top of your huevos rancheros. ;)

Ingredients:
4-5 pounds boneless pork shoulder or pork butt, cut into 2-inch cubes, fat left intact
campaignIcon

3/4 cup orange juice
1/4 cup lime juice (from about 2 to 3 limes)
4 cloves garlic, peeled and crushed
2 teaspoons ground cumin
2 teaspoons Kosher salt, plus more to taste
For serving: corn tortillas, cheese, Southwestern Slaw or shredded lettuce, and salsa verde
Read more at http://www.bunsinmyoven.com/2013/01/10/authentic-tex-mex-carnitas/#WSKFT7w3741sS7To.99
4-5 pounds of boneless pork shoulder or pork butt cut into 2 inch cubes with fat still intact.
3/4 cup orange juice
1/4 cup lime juice
4 cloves garlic
2 teaspoons ground cumin
2 teaspoons salt, plus more to taste
For serving: corn tortillas, cheese, southwestern slaw, and salsa.


Directions:
Place pork in a heavy bottomed pot. Add the orange juice, lime juice, garlic, ground cumin, and salt. Then add just enough water to cover the top of the pork.
Bring to a boil and reduce the heat to simmer. Simmer uncovered, without stirring, for two hours.
Increase the heat to medium high and stir the meat occasionally.  The more that you stir the meat the more that the meat starts to fall apart.
Continue cooking until all the water has evaporated, about 45 minutes, leaving only the pork fat. Let it fry, turning as needed, until the meat is crispy and browned.
Add salt as needed and serve on corn tortillas. Before placing the meat in the tortillas make sure you wrap about 6 in damp paper towels and heat them up in the microwave for about a minute. If you don't do this the tortillas will crack.
I topped our carnitas with a southwestern slaw kit that I found next to the lettuce in the produce section of our grocery store. It came with a cilantro dressing that was really good.

Source: Buns In My Oven

These carnitas would be delicious along side some Seven Layer Dip or The World's Best Queso!

http://gloriouslymade.blogspot.com/2013/10/seven-layer-dip.html

http://gloriouslymade.blogspot.com/2013/10/worlds-best-queso.html


Deanna
4-5 pounds boneless pork shoulder or pork butt, cut into 2-inch cubes, fat left intac
Read more at http://www.bunsinmyoven.com/2013/01/10/authentic-tex-mex-carnitas/#WSKFT7w3741sS7To.99
4-5 pounds boneless pork shoulder or pork butt, cut into 2-inch cubes, fat left intact
campaignIcon

3/4 cup orange juice
1/4 cup lime juice (from about 2 to 3 limes)
4 cloves garlic, peeled and crushed
2 teaspoons ground cumin
2 teaspoons Kosher salt, plus more to taste
For serving: corn tortillas, cheese, Southwestern Slaw or shredded lettuce, and salsa verde
Read more at http://www.bunsinmyoven.com/2013/01/10/authentic-tex-mex-carnitas/#WSKFT7w3741sS7To.99
4-5 pounds boneless pork shoulder or pork butt, cut into 2-inch cubes, fat left intact
campaignIcon

3/4 cup orange juice
1/4 cup lime juice (from about 2 to 3 limes)
4 cloves garlic, peeled and crushed
2 teaspoons ground cumin
2 teaspoons Kosher salt, plus more to taste
For serving: corn tortillas, cheese, Southwestern Slaw or shredded lettuce, and salsa verde
Read more at http://www.bunsinmyoven.com/2013/01/10/authentic-tex-mex-carnitas/#WSKFT7w3741sS7To.99

Tuesday, November 19, 2013

Buffalo Chicken Wings


Last Saturday night we watched the Texas Longhorns play football as a family. It's so much fun to see all the boys get so excited about a game wearing their burnt orange shirts. I absolutely love this time of year and watching football together. And there isn't a better meal to eat while watching a game than chicken wings! This recipe is messy, but easy & delicious! It is given the thumbs up from the men in my family. I hope that you enjoy them as well. What are you favorite types of wings? We love Buffalo sauce on ours.

Ingredients:
3/4 cup all purpose flour
1/2 teaspoon cayenne pepper
1/2 teaspoon garlic powder
1/2 teaspoon salt
20 chicken wings
1/2 cup melted butter
1/2 cup Franks Buffalo Wing sauce

Directions:
  1. Line a baking sheet with aluminum foil, and lightly grease with cooking spray. Place the flour, cayenne pepper, garlic powder, and salt into a resealable plastic bag, and shake to mix. Add the chicken wings, seal, and toss until well coated with the flour mixture. Place the wings onto the prepared baking sheet, and place into the refrigerator. Refrigerate at least 1 hour.
  2. Preheat oven to 400 degrees F
  3. Whisk together the melted butter and hot sauce in a small bowl. Dip the wings into the butter mixture, and place back on the baking sheet. Bake in the preheated oven until the chicken is no longer pink in the center, and crispy on the outside, about 45 minutes. Turn the wings over halfway during cooking so they cook evenly.
  4. For more crispy wings broil for 5 minutes after they are done cooking or until you get the desired crisp that you are wanting. 

Source: All Recipes

Saturday, November 16, 2013

Pimento Cheese


What's for lunch today?? How about this delicious Pimento Cheese Sandwich?

Ingredients:
4 oz cream cheese at room tempurature
1 cup cheddar cheese
1 cup Monterrey Jack
1/2 cup of Mayonaise
2-3 tablespoons diced pimento
1/2 teaspoon salt
1/2 teaspoon garlic powder
1/2 teaspoon pepper

Directions:
Combine all the above ingredients. Serve with crackers or as a sandwich filling.

Adapted from Paula Dean

Thursday, November 7, 2013

Pork Canitas

http://www.memoriesbythemile.com/2013/11/pork-carnitas.html


Happy Thursday everyone!! It's almost the weekend and I am so excited for some time to relax a bit. Today I am sharing my Pork Carnitas recipe over at Memories By The Mile and would love all of you to hop over there and see how this delicious meal is made. It is a fantastic recipe!! Hope everyone has a great weekend as well. :)

Deanna

Wednesday, November 6, 2013

Bean & Corn Salsa


I made this dip to go along with Pork Carnitas (that I will share with you tomorrow) and it is truly addictive!! Is so easy too. Throw everything into a bowl the night before and it's ready to serve the next day with your meal. It would be a perfect appetizer at a football party or your next bar b que.

Ingredients:
  • 1 can black-eyed peas – drained & rinsed
  • 1 can black beans – drained & rinsed
  • 1 can yellow corn – drained
  • 1/2 cup chopped onion
  • 1/2 cup chopped green pepper
  • 1/4 to 1/2 cup finely chopped jalapeno peppers
  • 1 can petite diced tomatoes – do not drain
  • 1/2 teaspoon garlic salt
  • 1 – 8oz. bottle Italian salad dressing
Directions:
Combine all ingredients in a medium size bowl. Cover and refrigerate overnight. Serve with tortilla chips.

Source: Celebrations at Home

Monday, November 4, 2013

Huevos Rancheros


One of our favorite breakfasts when I was young and even now is Huevos Rancheros which is Spanish for ranch style eggs. There are many different ways to make the ranchero sauce but today I went with the easy recipe and used an already made salsa.  Enjoy! 

Ingredients:

8 corn tortillas
8 eggs
oil
1 can refried beans (I used Traditional Old El Paso)
fresh salsa
Queso Fresco
cilantro
salt and pepper to taste

Directions:
  • Pre heat your oven to 250 F.
  • Open your can of refried beans and heat on a low setting stirring often. You don't want your beans to dry out or burn.
  • I like to use fresh salsa from the fridge, but don't want it cold on my eggs so I warm the salsa in a small pan.
  • Pour 2-4 tablespoons of oil into a frying pan and heat to a medium heat.
  • Fry each corn tortilla until it is slightly brown and a little firm. After each tortilla is done place them in the warm oven to keep warm.
  • Fry your eggs to your liking. We like ours over easy.
  • To assemble your Huevos Rancheros take a fried corn tortilla, spread with refried beans, place an egg on top, drizzle with salsa, sprinkle with Queso Fresco cheese, and lastly garnish with a little bit of cilantro.
Enjoy your South Texas breakfast!! Have a great day! :)

Sunday, November 3, 2013

Chili


You just can't go wrong with making this chili!! So So easy and just perfectly delicious on a cold Fall/ winter day. I buy 2 Alarm Chili Kit and follow its instructions on the back of the box adding all of the ingredients plus three different types of beans and an additional can of chili style tomatoes. You can cook it on the stove top and have it ready in about a half hour or you can slow cook yours for 4-6 hours in your slow cooker. I love slow cooking ours. I feel like it really gives the flavors time to cook together. What is your favorite way of making chili at your house?

Ingredients:
1 box of 2 Alarm Chili Kit
2 lbs of Ground Beef
1 8oz can of Tomato Sauce
1 15oz can of diced chili style tomatoes
2 8oz cans of water
1 15oz can of pinto beans
1 15oz can of kidney beans
1 15oz can of white kidney beans


Directions:
  • Brown the ground beef and drain the fat.
  • Add the tomato sauce,water, beans, and seasoning packets (except the red peppers and masa flour) that come in the 2 alarm chili box.  Add the whole packet red pepper flakes if you want Hot chili and only half the packet if you like medium heat chili. If you like your chili to be thick add the Masa Flour packet. I always leave this packet out because I like my chili to be not so thick. 
  • Cover and simmer for 30 minutes or until meat is tender stirring occasionally.

Wednesday, October 30, 2013

Skillet Four Cheese Baked Pasta


Happy Wednesday friends!! I hope everyone is doing well today. :) I cooked this yummy dish in my oven proof skillet which made clean up really easy, just one dish. ;)  Who doesn't love that!! Super easy to throw together and it makes a lot so we were able to have leftovers for lunches during the week. What one dish meals are your favorite?

Ingredients:
1 lb rotini or penne pasta
1 lb Italian Sausage
2 sweet red peppers
1 onion
1 Tablespoon Olive oil
1 jar Marinara Sauce
2 cups Italian Cheese blend

Directions:
  • Heat oven to 450 F. Cook pasta following package directions. Drain.
  • While pasta is cooking, cut sausage into 1/2-inch slices. Seed and slice peppers and slice onion. When I cook a dish like this I always like to eyeball how many onions and peppers I put in. I don't like every bite to be full of onions and peppers. The original recipe calls for 4 cups. I diced all of mine up and tossed a hand full in, stired, and then added more to get the desired taste for our family. Heat olive oil in a large ovenproof skillet over medium-high heat. Add sausage, peppers and onions. Cook, 10 minutes, stirring occasionally, until peppers and onions are tender and the sausage is cooked through. Add sauce and bring to a simmer. Stir in the drained pasta and 1 cup of the cheese.
  • Sprinkle remaining cheese over the pasta and bake at 450 F for 8 minutes or until cheese melts and casserole starts to bubble. Cool 5 minutes before serving. 


Source: Recipe.com  

Tuesday, October 22, 2013

World's Best Queso


My step daughter told me about some queso that she had that was the BEST! I asked her what was different about it and she was told that there was cream of mushroom soup and that was all she could remember. Well, shortly after that I ran across a pin on Pinterest that was titled The Greatest Queso That Ever Lived and sure enough I looked at the ingredients and there was the cream of mushroom soup. I made the queso the other night and I must say it is pretty good. I don't think I will ever be able to just put Rotel and ground beef in my queso again.  ;)  The added cream cheese and ground sausage (that's what I chose instead of ground beef) made this dip delicious!

Ingredients:
  • 1 block (32 Oz. Block) Velveeta Cheese
  • 1 package (8 Oz. Package) Cream Cheese
  • 1 can (10 Oz. Can) Rotel
  • 1 can (10.75 Oz. Can) Cream Of Mushroom Soup
  • 1 pound Ground Beef OR Sausage (or A Combination Of Both)

Brown ground beef or sausage (or both) in a pan over medium heat and set aside. Cut up the Velveeta and cream cheese into cubes and place into a crock pot. Pour in the Rotel and the cream of mushroom soup and stir ingredients together. Place the crock pot on low setting for an hour, letting the ingredients meld. After about 30 minutes, add the browned meat and continue to let cook, stirring as needed. 

Source: Tasty Kitchen
  •  

Monday, October 21, 2013

Pumpkin Crumb Cake


I love the Fall and this here is just one of the reasons. I get to eat pumpkin!! I LOVE pumpkin pie, cookies, bread, cake.... the list goes on and on. Except for soup. I just can't get into pumpkin soup. Maybe I just haven't had a good bowl yet...  Anyway, I love this pumpkin cake and couldn't wait to share it with you. I hope you love it too. :)

Ingredients:
1 3/4 cups all-purpose flour
1 1/2 teaspoons pumpkin pie spice
1 teaspoon baking soda
1 teaspoon baking powder
3/4 teaspoon salt
1/2 cup (1 stick) unsalted butter
1 1/4 cups sugar
3 large eggs
1 cup canned pureed pumpkin
1 teaspoon vanilla extract
1/3 cup milk

Topping:
2/3 cup plus 2 tablespoons rolled oats
1/2 cup all-purpose flour
1/2 cup firmly packed light brown sugar
1/2 teaspoon cinnamon
6 tablespoons unsalted butter

 Directions:
  • Preheat oven to 350°F.
  • Grease a loaf pan and line with parchment paper.
  • To make the topping, combine 2/3 cup oats, flour, sugar, and cinnamon in processor. Add butter and cut in until crumbly. Transfer mixture to medium bowl. Stir in remaining 2 tablespoons oats. Set to one side.
  • Sift the flour, pumpkin spice, baking soda, baking powder, and salt into a bowl.
  • In a separate bowl, beat the butter with an electric mixer until smooth. Gradually beat in the sugar and 1 egg at a time
  • Add the pumpkin and vanilla extract to the wet batter mix.
  • Gradually beat the dry ingredients into the batter. Slowly add the milk. Transfer the batter to the prepared pan and spread with the topping.
  • Bake the loaf cake until a toothpick inserted into center comes out clean, about 55 minutes. Cool in the pan for 15 minutes.
  • Turn the cake out onto a rack and cool completely.

Source

Thursday, October 17, 2013

Gluten Free King Ranch Chicken


This is another recipe that I made for my mother that is gluten free. She loves King Ranch Chicken and hadn't eaten it since diagnosed with Celiac disease in May. You honestly can not tell the difference between the original and the gluten free. So So Good! The only difference is the condensed soups. I bought the gluten free version. You can see the picture of what I bought below so that you can recognize it in the stores. It's a little more expensive but 100% worth it!

Ingredients:
  • 1 dozen Mission corn tortillas
  • 1/2 cup chicken stock (I use the broth from when I cooked my chicken to shred)
  • 2-3 cups shredded chicken breast
  • 1 large green pepper, chopped
  • 1 large onion, chopped
  • 2-4 tablespoons cooking oil
  • 1 lb shredded cheddar cheese
  • 1 teaspoon chili powder
  • garlic powder and salt to taste
  • 1 10 3/4oz box of Pacific Organic cream of chicken soup
  • 1 10 3/4oz  box of Pacific Organic cream of mushroom soup
  • 1 10 oz can of Rotel

Directions:

Preheat oven to 375. Cook chicken and shred. I use the shredded chicken that I previously seasoned, cooked, and froze for later use. You'll find that recipe here, whole chicken cooked in the slow cooker or you can use one can of Rotel tomatoes with about 4 boneless skinless chicken breasts in the slow cooker until it just falls a part. Saute peppers and onions using the cooking oil. Blend all ingredients together in a greased 9x13 casserole dish. Bake for 30 minutes or until done.

Below is a picture of the gluten free condensed soups.

Monday, October 14, 2013

Chocolate Butter Frosting


Thank you Better Home & Gardens!! I'm never buying canned frosting again! So easy and So delicious!! We had some friends over the other night and I decide to make a last minute Devils Food cake.  I didn't have any frosting on hand and I didn't have time to go to the store. So, I went to old faithful and looked at all the different frosting recipes and decided on the Chocolate Butter Frosting. I've come to realize that there are things that you should always keep on hand in the pantry. Powdered sugar & cocoa powder are two of those items. It seems like I am always needing these last minute. Confession: We ate 1/2 the cake that night. My husband went out of town for the next three days. Who do you think ate the rest??? Never leave a chocolate cake in my presence alone again!! I have no self control!! ;)

Ingredients:
1/3 cup butter or margarine
4 1/2 cups sifted powdered sugar
1/4 cup milk
1 1/2 teaspoons vanilla
milk

Directions:
In a mixing bowl beat butter till fluffy. Gradually add 2 cups of the powdered sugar, beating well. Slowly beat in the 1/4 cup milk and vanilla.
Slowly beat in remaining powdered sugar. Beat in additional milk, if needed, to reach spreading consistency.
Beat 1/2 cup unsweetened cocoa powder into butter and reduce powdered sugar to a total of 4 cups.

Source: Better Homes and Garden Cookbook


Wednesday, October 9, 2013

Chicken Fettuccine Alfredo


This dish is a staple in our home! It's quick, easy, and everyone eats it. And trust me, those meals are hard to come by in a family of six when more than half of you are very picky little eaters!! :)

Ingredients:

  • 6 boneless skinless chicken breasts
  • McCormick Grill Mates Garlic, Herb & Wine Marinade
  • Bertoli Alfredo Sauce
  • Fettuccini pasta

Directions:

Using the McCormick marinade, marinate your chicken for 2-4 hours or over night.


Grill chicken on a medium heat for about 8 minutes on each side, depending on the thickness of your meat, or till the juices run clear.
In a medium pot boil enough water to cook your amount of Fettuccine.  Cook pasta according to package instructions.
While the pasta is cooking pour your Aflredo sauce into a small sauce pan and warm on a low heat. You don't want for it cook. Just warm the sauce.


When your pasta is done cooking and your sauce is done warming combine the two.
Take your cooked chicken and either place a whole piece on top of your Fettuccine Alfredo or cube it up like in the picture above and you can mix with your pasta. Cubed up is how our family likes to eat it because once it's all on your plate you can just focus on gobbling it all up instead of cutting up your chicken. :)

I hope that you enjoy this east recipe like we do! Our family loves eating it with a Caesar salad and garlic bread.

Monday, October 7, 2013

Gluten Free Muffelatas

My sweet mom at the age of 63 was diagnosed this summer with severe Celiac disease. She is six feet tall and got down to a very scary weight of 103 before the doctors ever were able to figure out what was wrong. Our whole family was terrified that something very serious was wrong and were all scared to death for her. She suffered for six long months trying so hard to figure out what was going on.

So, after me insisting that she have every test in the books run so we could get some answers we finally got the diagnosis. She called me in disbelief to tell me that after all these years she has Celiac!  I was over joyed!! Praise the Lord!! This illness we could work with!! I knew that it would change her lifestyle and be hard but we were going to have her with us and that was all that mattered to me.

I love cooking for my family when they come to visit. Unfortunately though most of my recipes have gluten in them. :( So each time they visit I am on the search to find delicious gluten free meals to make for her that we can all eat and enjoy. So far everything that I have made that is gluten free has turned out really good. I will be sharing the recipes here with you. You can find them all using the gluten free tag over on my right side bar.

The muffelatta sandwich is so good!! I have always loved the olive mix and this recipe tastes just like the one I had in New Orleans if not better. This sandwich is practically all gluten free except for the bread. My mom LOVES Udi's gluten free bread so that is what she ate her sandwich on. When looking at this recipe I wasn't sure which meats would be gluten free, if any. But when I went to my local grocery store I learned that ALL of Boars Head meats and cheeses are gluten free. I was a amazed!! Their meats are so fresh and delicious. It's what I always buy anyway and now I can continue to serve on sandwiches when my family is in town.

Since my moms diagnosis she hasn't been sick for one day! Isn't that great!! She has put on thirty pounds and feels wonderful. She loves her new diet and how it makes her feel. I hope that you come back to see what great gluten free meals that I have found and am sharing with my mom. Hope everyone has a great week!


Olive Mix Ingredients:
  • 3/4 cup pimento-stuffed olives
  • 1/4 cup pitted Kalamata olives
  • 1/4 cup giardiniera (Italian pickled vegetables)
  • 2 lg. pepperoncini
  • 1 md. clove garlic, chopped
  • 1 tsp. dried oregano
  • A couple of grinds of blackpepper
  • 2 tsp. fresh lemon juice
  • 2 Tbsp. olive oil

Directions to make olive mix:

1. Drain all ingredients.
2. Place all ingredients in a food processor and pulse until finely chopped.
3. Refrigerate overnight.


To make a Gluten Free Muffelatta Sandwich you will need:
  • 1 loaf Udi's Gluten Free Bread
  • 1 cup olive mix
  • 1/4 lb Boar's Head sliced ham
  • 1/4 lb Boar's Head sliced pepperoni
  • 1/4 lb Boar's Head sliced salami
  • 1/4 lb Boar's Head sliced provolone
  • 1/4 lb Boar's Head sliced mozzarella
  • 1/4 lb Boar's Head sliced turkey

 To assemble the sandwich:

  1. Using two slices of the Udi Gluten Free bread spread a spoonful or two of the olive mix on one half of the bread
  2. Then layer however many pieces of the ham, pepperoni, salami, provolone, mozzarella, & turkey that you wish for your sandwich.
  3. Place your other half of bread on the layers and enjoy your homemade Italian sandwich! :)
Below is a picture of a NON Gluten free Muffelata sandwich. The only difference though between the two sandwiches is the bread. On the this sandwich I used Focaccia bread which was NOT Gluten Free.


Thursday, October 3, 2013

Huevos Rancheros


Happy Thursday everyone!! It's almost the weekend! :)

On the first Thursday of every month I am going to be a recipe contributor over at Memories by the Mile. I simply will post a picture of my recipe on my blog that day with a link that will take you to Memories by the Mile to get the recipe.

Hope everyone has a great weekend and have fun going to check out Memories by the Mile!

Click HERE to get the Huevos Rancheros recipe. 


Wednesday, October 2, 2013

Seven Layer Dip


 Do Not leave me alone with this dish!! I swear I will eat the whole thing!! I love every layer by itself so when you put it all together I go crazy. ;)

Ingredients by layer:
Layer 1: Refried beans (I use Old Elpaso)
Layer 2: Guacamole
Layer 3: Sour Cream
Layer 4: Rotel tomatoes
Layer 5: Mexican Cheese
Layer 6: Black Olives
Layer 7: Cilantro or Green Onions


Directions:
In a 8x8 or 9x13 dish spoon each layer on top of each other. We love to eat our dip with Tostitos tortilla chips.


Thursday, September 26, 2013

Cinnamon Coffee Cake


Have you always wanted cake for breakfast?!?! Well, you have now found the perfect recipe ;) So easy, so delicious, and  perfect for just you and your family or to take to the office to win your boss over. ;) 


Ingredients:
1 (18.25 ounce) package yellow cake mix
1 (3.4 ounce) package instant vanilla pudding mix
1 (3.4 ounce) package instant butterscotch pudding mix
4 eggs
1 cup water
1 cup vegetable oil
1 cup packed brown sugar
1 tablespoon ground cinnamon
1 cup chopped walnuts

Directions:

Preheat oven to 350 degrees F. Grease a 9x13 inch baking pan, or a 10 inch Bundt cake pan.

Stir together the cake mix, vanilla pudding mix, and butterscotch pudding mix. Add the eggs, oil and water, mix until well blended. In another bowl, stir together the brown sugar, cinnamon and nuts. Pour half of the batter into the pan, spread evenly. Sprinkle with half of the nut mixture. Cover with the rest of the batter, and sprinkle with the rest of the nut mixture.

Bake for 20 minutes in the preheated oven, then turn the oven down to 325 degrees F and bake for an additional 35 to 40 minutes.


Source: All Recipes 

Wednesday, September 25, 2013

Patty Melts


 Last week I served these up for us during the Texas football game. Our team hasn't been doing really good so far this year so I made us some good ole comfort food to get us through another game. These sandwiches helped my hubby forget about the game for a little bit. ;)

Ingredients

  • 1 stick Butter
  • 1 whole Large Onion, Halved And Sliced
  • 1-1/2 pound Ground Beef
  • Salt And Pepper, to taste
  • 5 dashes Worcestershire Sauce
  • 8 slices Swiss Cheese
  • 8 slices french bread
 Directions:

Start your grill to medium heat.
In a medium skillet, melt 2 tablespoons of butter over medium-low heat. Throw in the sliced onions and cook slowly for 20 to 25 minutes, stirring occasionally, until the onions are golden brown and soft.


In a medium bowl, mix together the ground beef, salt & pepper, and Worcestershire. Form into 4 patties.
Take your patties out to the grill and cook the patties on both sides until totally done in the middle, or to however you like your ground beef cooked.
After you have cooked your meat bring them inside and assemble you sandwiches.
Take your bread, a slice of cheese, one of the hamburger patties, 1/4 of the cooked onions, another slice of cheese, and lastly another slice of bread. In a clean skillet melt 2 tablespoons of butter and grill the sandwiches over medium heat until golder brown.  Remove the sandwiches and add the remaining 2 tablespoons of butter to the skillet. Turn the sandwiches to the skillet, flipping them to the other side. Cook until golden brown and crisp, and until cheese is melted.


Slice in half and serve immediately!

Recipe modified from The Pioneer Woman


Friday, September 20, 2013

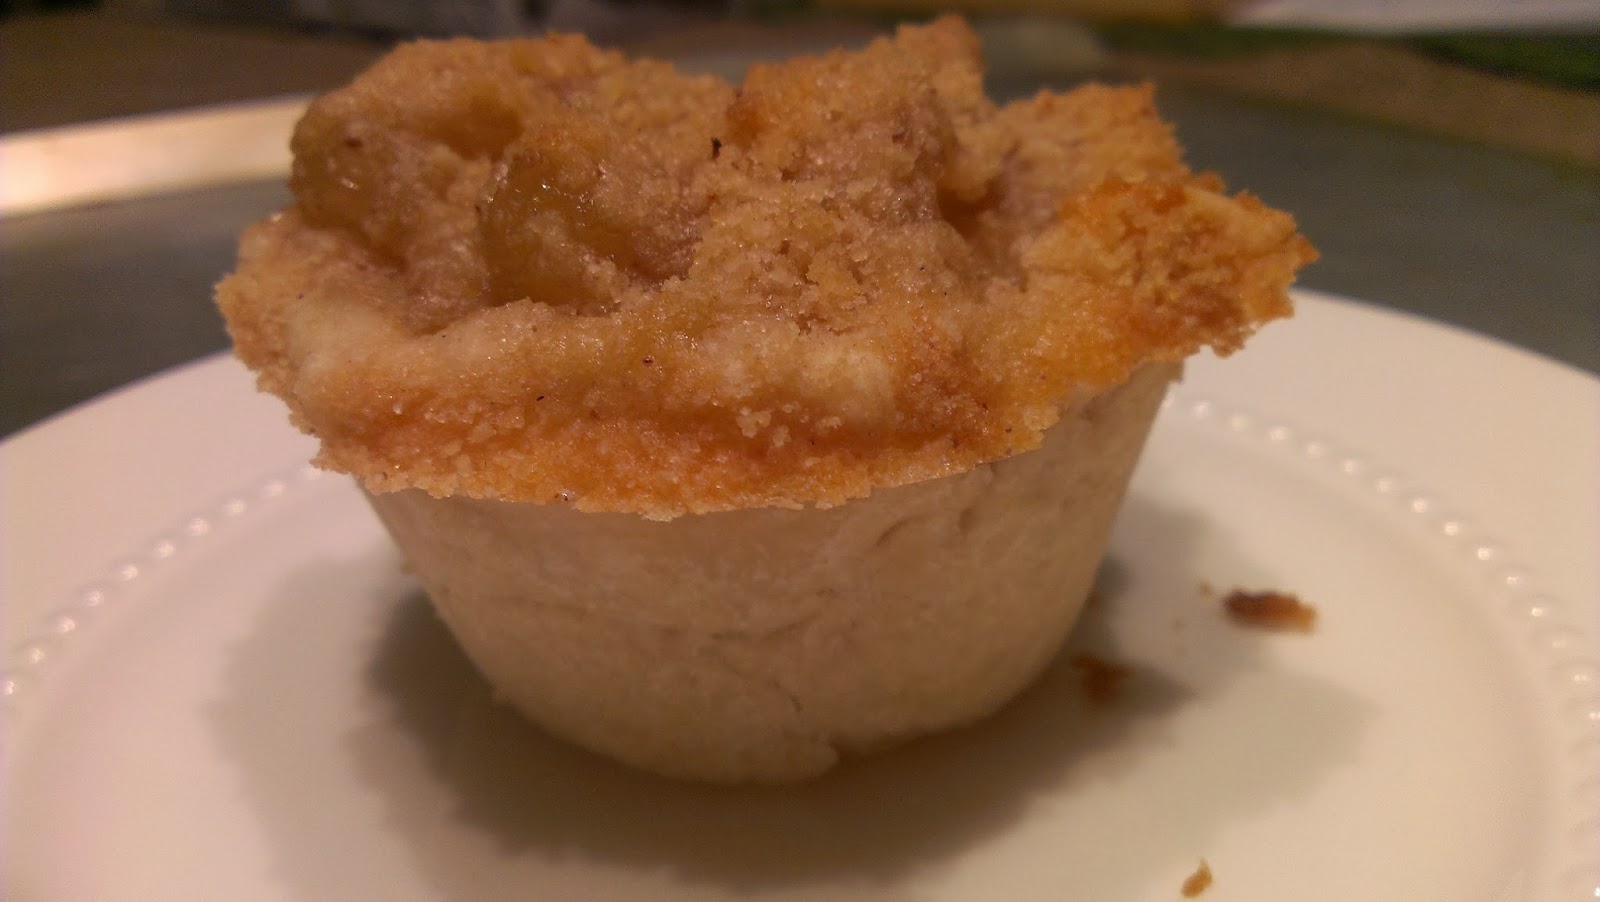
Mini Apple Pie


Is this not the cutest mini apple pie you have ever seen?!? My husband laughs at me because I get SO excited when I cook. Nothing makes me happier than to cook something up and have it look pretty on a plate, and be delicious too. I know, I'm a huge nerd, but it brings such joy to my heart when I'm in the kitchen cooking for my family. And now, I get to share my recipes with all of you. :) These pies are a perfect end to any meal and pretty easy to throw together. I hope you enjoyed them as much as we did! Have a great weekend y'all.

Ingredients: 

Crust
1 cup flour
½ tsp salt
⅓ cup chilled vegetable shortening
¼ cup ice water

Filling
Can of Apple Pie Filling

Topping
¾ cup firmly packed brown sugar
¾ cup all purpose flour
½ tsp ground nutmeg
⅓ cup chilled butter cut into small pieces

Directions:
First you will make the crust. Simply combine the flour and salt. Then using two knives, or a pastry clender, cut in the shortening until coarse crumbs form. Once the crumbs form start adding a tablespoon of ice water at a time until a dough forms.


Shape dough into a disk, wrap in plastic wrap and chill for 30 minutes.


 Preheat oven to 400 degrees.

On a floured surface roll out dough and cut into 4x 4 inch circles to make mini pies. I used a lid as a guide to make my circles.


Fit dough to pie pans. I used a cupcake pan. You could also use ramekins.


Fill your mini pie crusts with the apple pie filling.


Lastly you will prepare the topping by combining the brown sugar, flour, and nutmeg. Then cut in the butter until coarse crumbs form. Sprinkle on top of the mini pies.


Bake pies until topping is lightly browned and filling is bubbly, about 35 minutes.


 These pies popped right out of my muffin pan beautifully! They are scrumptious!!
 Serve with vanilla ice cream.

Modified from The Happier Homemaker