Showing posts with label Valentines. Show all posts

Friday, January 17, 2014

ABC i love u

https://app.box.com/s/dwcs9ym3h14jm6j58tmj

Have you seen this printable?? I'm not sure where I saw this last year, but knew I wanted one of my own to put up in the house. So I made this on Photoshop and wanted to share it with you. Just click the above image and print. This would also be super cute to give to a teacher with a little candy attached to it. The size is an 8x10. I hope that you can use it. :)

Deanna

Friday, February 15, 2013

Love burgers


I hope that everyone had a wonderful Valentine's day and was able to share the day with those that they love most in this world. Also, I hope that in everyone's heart you remembered the true One that will love you forever, our most precious Lord and Savior Jesus. It is in Him that we are capable of loving others and it is through Him that we are given eternal life. I ran across John 3:16 written in a special way and I wanted to share it with you.

In love, my wonderful husband helped me make heart shaped hamburgers for our family on Valentines Day. I think he gets into the holidays just as much as I do. It's really cute. :)

First, we shaped the meat using heart shaped cookie cutters.


 Then, we threw them on the grill. Yum!


Added some heart shaped cheese.


We then, had a very delicous hamburger made with true love on this very special day!!


Wednesday, February 13, 2013

Teacher Valentine's

"Donut" you know I love you a HOLE bunch!


Hey Cupcake! We love you for shaping our kids!


Print Friendly and PDF

Sunday, February 10, 2013

Early Valentine Snack


Watermelon hearts on a toothpick


Hotdog shaped hearts with a cheese arrow

Yesterday I was in a crafty mood and wanted to make a fun treat for my boys. Both snacks were a huge hit and fun to make!!

Monday, January 28, 2013

Free baseball valentine

 
This year I decided to make my boys their own Valentine's Day cards for them to give to their friends at school. I ran across the idea of You're a hit Valentine on a baseball and loved it because my boys are constantly outside throwing balls with their dad. 
I took a picture of one of their baseballs and using Photoshop I removed the background and in a new layer typed the wording. I then flattened my image and saved as a jpeg. After printing the baseballs onto card stock and cutting them out I punched two holes to stick a sucker through and then I was done!! So Cute and super easy!! I love the way they turned out and I think the boys will too.
If you would like for me to send you this image as a jpeg please message me and I would be more than happy to send it to you. I can also change the name for you as well or just take it off. :)
Happy crafting!!
 

Friday, January 25, 2013

Valentine subway art

I love subway art!! I think it is a fun piece to add to any holiday decor. Not only is it cute but I have found a place that you can get it for free. :) Gotta love that. Go to eighteen25.blogspot.com and download the art of your choice and you can print and frame it!! Above is a picture of my Valentine subway art that I have in our living room on a coffee table.

Saturday, January 12, 2013

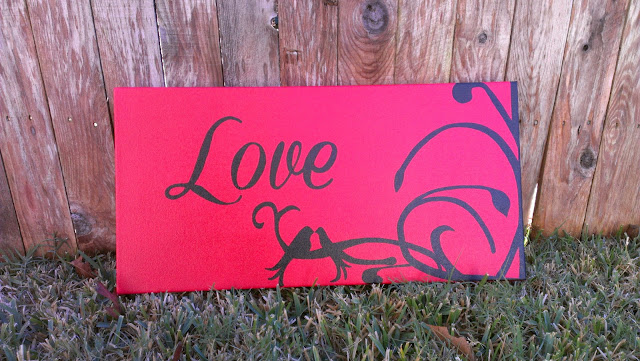
Love Birds

Love Birds


I have started decorating for Valentine's day around the house and wanted a Love sign to place in my entry way. After searching some of my favorite blogs for ideas I put together this sign in my head. I knew what I wanted but needed something to guide me before I started painting. As I'm sure most of you that know me know that I am totally addicted to Pinterest. I have pinned quite a few free fonts and went directly to those looking for the font I wanted to use for the word Love. I ended up choosing Coneria Script from the Lil Luna blog. I really liked the way it made the word Love look. Just what I was wanting. :)

Now for the rest of the canvas. I knew that I wanted two birds sitting on a branch but wasn't sure where to get my inspiration. I Googled birds on a branch and a ton of images popped up. Some free and some REALLY expensive. I wanted free so I went with the site Clker.com and downloaded the free image.

I have been very interested in transferring images onto canvas, wood etc. and have been seeing several pins on this topic. After reading and trying several unsuccessful transferring techniques I decided to go with, what I think, is the easiest for me at this point. The wax paper method is what I chose from Unexpected Elegance.com. It's really very easy. Her website explains it well, but here is a quick run down. ;)

Wax Paper Method:

  • Copy paper
  • Wax paper cut to your copy paper size
  • A printer
  • A photo editing program such as Photoshop


What to do with your image:

  • Type the word you like onto a new page in Photoshop
  • Go to Image, Rotate, and then flip horizontal (this makes your image a mirror image so that when you place it onto the canvas it is written correctly)


Directions:

  • Glue the non wax side of the wax paper to the copy paper
  • Place the wax paper side down into your printer
  • Print the image reversed
  • Quickly place your copy onto the canvas. Your copy is wet so do not touch the ink. Also, once you place it onto the canvas do not move it because it will smear. (I learned this from experience)
  • Rub really hard with your fingers or the back of a spoon to transfer the image onto the canvas.
  • After checking the corners of your print to make sure you like the transfer then you can remove the paper 


For this project I bought an Artist's Loft 12in x 24in canvas from Michael's , Krylon indoor/outdoor banner red spray paint, and used a craftsmart paint pen in black.

How I made the canvas:


  • I spray painted the canvas in red
  • Transferred both my images using the wax paper method
  • Then went over my transfers using the black paint pen. I found that when I transfered the images they weren't dark enough so I tried the paint pen and LOVED the way it turned out. 


I hope that you like the way the canvas turned out as much as I did. I am very happy. Here is a picture of the canvas in my entry way along with my two new topiary's. I'll explain how I made them in my next post. :)